


HO Southern Pacific Suburban Coach
Made by
Print With Shapeways
 Choose Your Material
 Choose your color and finish
$169.72
Have a question about this product?
contact the designerYou must be logged in and verified to contact the designer.
Product Description
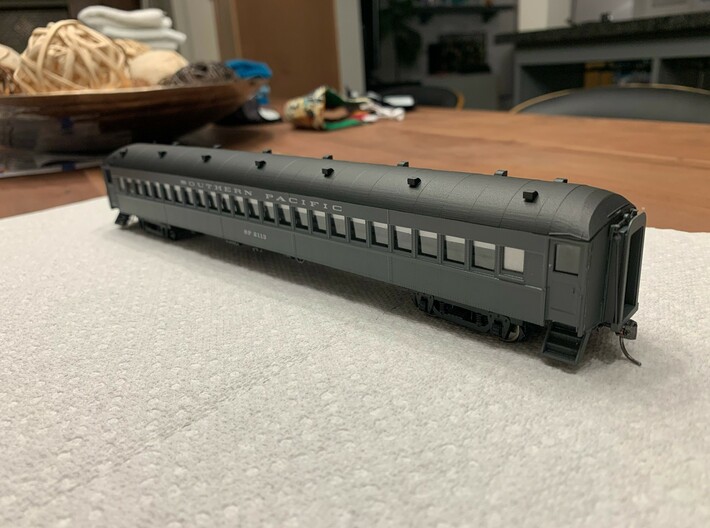
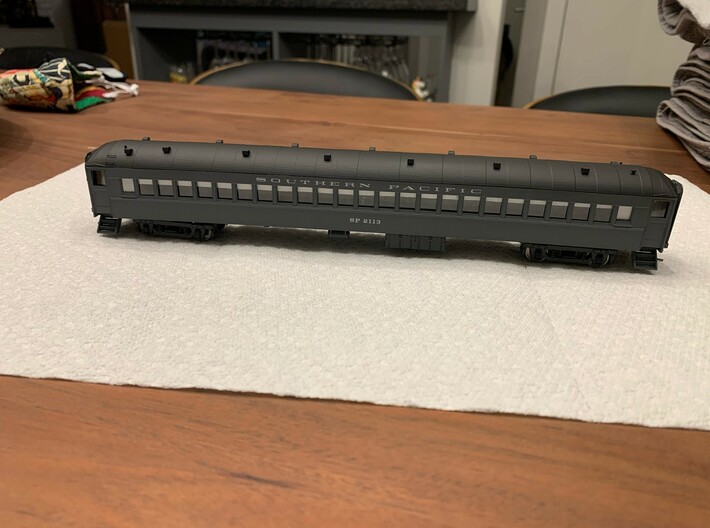
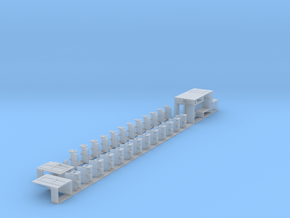
This kit builds a 72-IC-1, 2, or 3 Southern Pacific or Caltrain suburban commuter coach.
These were in service in the bay area for around sixty years.
An interior kit is sold separately in my shop here on shapeways.
https://www.shapeways.com/product/MR7KS85NJ/southern-pacific-suburban-coach-interior
A shopping list to finish this model:
- .010 phosphor bronze wire for bending into hand-holds - available inexpensively through Tichy Train Group.
- .015 phosphor bronze wire for bending into brake rods - available inexpensively through Tichy Train Group.
- Walthers trucks "Pullman-Standard 8' Wheelbase, Heavyweight 4-Wheel Trucks -- Black - 1 Pair" part number 920-2124.
- Kadee 148 whisker couplers and boxes.
- Diaphragms of your choice (coach yard are used on the prototype model shown in photos here).
- 1/4 inch 2-56 screws to attach the body to the floor and hold the trucks and couplers.
- Decals - I used ThinFilm 159 to decal the model shown.
- Sheet lead - available inexpensively on Amazon, even in California.
Assembly instructions:
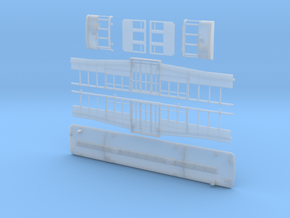
I do hope you enjoy this kit. It assebles VERY easily in comparison to a branchline blueprint kit. If you've never built a 3D printed kit before, don't worry, it isn't rocket science. Detailed instructions are below. Before you ask/complain about the weird curvature of the roof ends, study a photo of the real car. The roofs were not rounded as much as they were flat sheets folded into conical shapes and riveted.
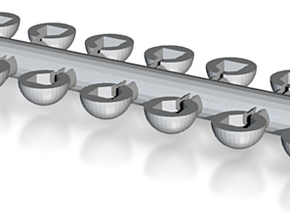
It is critical to note that this is not an injection molded kit. There will be some texture to the parts, but with careful prep and paint application it will be barely noticeable on the finished model.
The prototype model shown in the attached photos is not modified significantly in any way from what you will receive so that you can see exactly what you are getting. If you are adept with a sanding stick you can probably really fine tune this car in a couple minutes.
This material is fairly strong, but can break if forced. Don't panic if you break something, just get some ZAP glue and glue it back together. This stuff breaks cleanly and will glue back almost like nothing ever happened.
Also note: Shapeways has been noted for occasional lapses in quality control and uncareful packaging. That said, they do work to make things right when they mess up, so please contact them if you get a part that is broken or mis-printed.
1. Scrub all parts with un-diluted simple green and a tooth brush. I use a sonicare electric toothbrush. Rinse while scrubbing with the hottest water you can keep your hands in without getting scalded. Repeat for as long as you feel any waxy coating on the parts. This is critical for paint adhesion and longevity. Also, the hot water rinse is your opportunity to gently bend back into shape any parts that may have bent a bit in the packaging. Just hold it in the right shape under the hot water and let it cool as you hold it. It should retain the new bend.
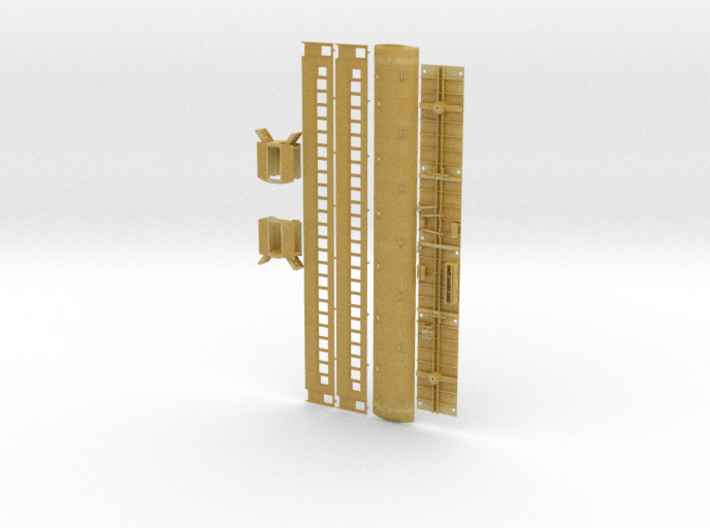
2. Tap the holes in the mounting pads found on the back sides of the side walls with a 2-56 tap. Also tap the truck mounting holes with the 2-56 tap. Go easy and don't force it or you'll crack the model.
3. The hand holds and roof grabs have thier holes "pre-drilled" in the model to accept .010 wire. I use a Micro Mark handhold bending tool to bend my grabs in exact lengths so they look uniform. Make the legs a bit long to protrude into the carbody for easy and invisible gluing. I use CA (super glue) from the inside of the model to hold the grabs in place. If you want to buy one of these bending tools, there is a 10% discount available if you use the discount code "boulder" (works as of 10/1/20). There are hand holds on either side of the doors on the car sides at about a 30 degree angle into the doorway, there are two hand holds on the bottom edge of each end sill, and there are two hand holds on each end of the roof. While the holes are already in the print, it does help to poke a drill through the holes before you start to make sure no wax is clogging the hole.
4. Add brake beams using .015 wire. There should be two from the little beams ahead of the trucks to the trucks, but I terminate them adjacent to the truck mounting post. Those little beams get connected with rods to the slack adjuster, which also has a rod across it's beams. A chain can be added between the handbrake lever and the brake cylinder beam.
5. I paint the model in parts so the only masking required is if you decide to paint the interior walls. You can paint it whole if that's your perogative, but I prefer the easy way.
6. Glaze the windows with some clear styrene and some canopy glue.
7. Assemble the model. I glued the sides to the roof first. There are locator pegs to aid in alignment. Press the pegs on the sides into the holes on the roof and keep pressure on the seam as you dab CA superglue onto the seams from the inside with a toothpick. To get a sufficient amount of glue without going overboard, I put some CA in an old plastic water bottle cap, then use a toothpick to dab the glue onto the seams of the carbody from the inside. The green label Zap is my favorite for this. The red lable is a bit runny and tends to glue my fingers to the model.
Once the sides are in, the ends can be inserted between the sides, note the little tips that stick off the upper corners of the outer ends. These should seat into the gaps between the sides and roof to aid in alignment. There are also tabs at the top of the interior end wall that should be inboard of the corresponding end wall segment in the roof. The ends and sides are identical and interchangeable. Once they are in place, I gently pull the side away from the end and use a toothpick to apply some AC glue to the edge of the end wall, then press the side back into it, holding until bonded, then go into the inside of the car and apply glue to the inside of the inner bulkhead seam while applying pressure from the outside to eliminate any gap between the step edge and side wall.
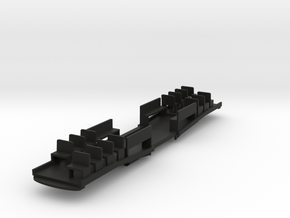
8. The floor orientation should have the side with the battery box aligned to the side of the car which has the two roof vents grouped tightly together on one side of one end of the roof.
9. Apply your choice of diaphragm and coupler. I purposely did not pre-drill the coupler screw holes for you because the fit of coupler and diaphragm is critical for operation, and all diaphragms are a little different.
10. Install the trucks. A couple washers may be needed to hold them on if your screw heads are small enough to fit through the truck bolsters. Check your coupler height and shim the box or shave the mounting pad as needed for the right level.
11. Add sheet lead to the inside of the floor and attach it with canopy glue for good adhesion.
12. Enjoy being the coolest kid on the block.
The prototype model shown is the basic "smooth fine detail plastic". You can really go all out and order it in "smoothest fine detail plastic", the option is yours.
Please feel free to reach out with questions.
These were in service in the bay area for around sixty years.
An interior kit is sold separately in my shop here on shapeways.
https://www.shapeways.com/product/MR7KS85NJ/southern-pacific-suburban-coach-interior
A shopping list to finish this model:
- .010 phosphor bronze wire for bending into hand-holds - available inexpensively through Tichy Train Group.
- .015 phosphor bronze wire for bending into brake rods - available inexpensively through Tichy Train Group.
- Walthers trucks "Pullman-Standard 8' Wheelbase, Heavyweight 4-Wheel Trucks -- Black - 1 Pair" part number 920-2124.
- Kadee 148 whisker couplers and boxes.
- Diaphragms of your choice (coach yard are used on the prototype model shown in photos here).
- 1/4 inch 2-56 screws to attach the body to the floor and hold the trucks and couplers.
- Decals - I used ThinFilm 159 to decal the model shown.
- Sheet lead - available inexpensively on Amazon, even in California.
Assembly instructions:
I do hope you enjoy this kit. It assebles VERY easily in comparison to a branchline blueprint kit. If you've never built a 3D printed kit before, don't worry, it isn't rocket science. Detailed instructions are below. Before you ask/complain about the weird curvature of the roof ends, study a photo of the real car. The roofs were not rounded as much as they were flat sheets folded into conical shapes and riveted.
It is critical to note that this is not an injection molded kit. There will be some texture to the parts, but with careful prep and paint application it will be barely noticeable on the finished model.
The prototype model shown in the attached photos is not modified significantly in any way from what you will receive so that you can see exactly what you are getting. If you are adept with a sanding stick you can probably really fine tune this car in a couple minutes.
This material is fairly strong, but can break if forced. Don't panic if you break something, just get some ZAP glue and glue it back together. This stuff breaks cleanly and will glue back almost like nothing ever happened.
Also note: Shapeways has been noted for occasional lapses in quality control and uncareful packaging. That said, they do work to make things right when they mess up, so please contact them if you get a part that is broken or mis-printed.
1. Scrub all parts with un-diluted simple green and a tooth brush. I use a sonicare electric toothbrush. Rinse while scrubbing with the hottest water you can keep your hands in without getting scalded. Repeat for as long as you feel any waxy coating on the parts. This is critical for paint adhesion and longevity. Also, the hot water rinse is your opportunity to gently bend back into shape any parts that may have bent a bit in the packaging. Just hold it in the right shape under the hot water and let it cool as you hold it. It should retain the new bend.
2. Tap the holes in the mounting pads found on the back sides of the side walls with a 2-56 tap. Also tap the truck mounting holes with the 2-56 tap. Go easy and don't force it or you'll crack the model.
3. The hand holds and roof grabs have thier holes "pre-drilled" in the model to accept .010 wire. I use a Micro Mark handhold bending tool to bend my grabs in exact lengths so they look uniform. Make the legs a bit long to protrude into the carbody for easy and invisible gluing. I use CA (super glue) from the inside of the model to hold the grabs in place. If you want to buy one of these bending tools, there is a 10% discount available if you use the discount code "boulder" (works as of 10/1/20). There are hand holds on either side of the doors on the car sides at about a 30 degree angle into the doorway, there are two hand holds on the bottom edge of each end sill, and there are two hand holds on each end of the roof. While the holes are already in the print, it does help to poke a drill through the holes before you start to make sure no wax is clogging the hole.
4. Add brake beams using .015 wire. There should be two from the little beams ahead of the trucks to the trucks, but I terminate them adjacent to the truck mounting post. Those little beams get connected with rods to the slack adjuster, which also has a rod across it's beams. A chain can be added between the handbrake lever and the brake cylinder beam.
5. I paint the model in parts so the only masking required is if you decide to paint the interior walls. You can paint it whole if that's your perogative, but I prefer the easy way.
6. Glaze the windows with some clear styrene and some canopy glue.
7. Assemble the model. I glued the sides to the roof first. There are locator pegs to aid in alignment. Press the pegs on the sides into the holes on the roof and keep pressure on the seam as you dab CA superglue onto the seams from the inside with a toothpick. To get a sufficient amount of glue without going overboard, I put some CA in an old plastic water bottle cap, then use a toothpick to dab the glue onto the seams of the carbody from the inside. The green label Zap is my favorite for this. The red lable is a bit runny and tends to glue my fingers to the model.
Once the sides are in, the ends can be inserted between the sides, note the little tips that stick off the upper corners of the outer ends. These should seat into the gaps between the sides and roof to aid in alignment. There are also tabs at the top of the interior end wall that should be inboard of the corresponding end wall segment in the roof. The ends and sides are identical and interchangeable. Once they are in place, I gently pull the side away from the end and use a toothpick to apply some AC glue to the edge of the end wall, then press the side back into it, holding until bonded, then go into the inside of the car and apply glue to the inside of the inner bulkhead seam while applying pressure from the outside to eliminate any gap between the step edge and side wall.
8. The floor orientation should have the side with the battery box aligned to the side of the car which has the two roof vents grouped tightly together on one side of one end of the roof.
9. Apply your choice of diaphragm and coupler. I purposely did not pre-drill the coupler screw holes for you because the fit of coupler and diaphragm is critical for operation, and all diaphragms are a little different.
10. Install the trucks. A couple washers may be needed to hold them on if your screw heads are small enough to fit through the truck bolsters. Check your coupler height and shim the box or shave the mounting pad as needed for the right level.
11. Add sheet lead to the inside of the floor and attach it with canopy glue for good adhesion.
12. Enjoy being the coolest kid on the block.
The prototype model shown is the basic "smooth fine detail plastic". You can really go all out and order it in "smoothest fine detail plastic", the option is yours.
Please feel free to reach out with questions.
Details
What's in the box:
Flat SP Suburban Coach v5

Dimensions:
Success Rate:
First To try.
What's this?
Rating:
Mature audiences only.
